Bathroom maintenance can often seem like a frustrating and time-consuming task, especially when it comes to fixing cracked caulking. While it might not seem like a major issue at first, cracked caulk can lead to bigger problems down the road, including unsightly appearances, mold growth, and even water damage if left untreated.
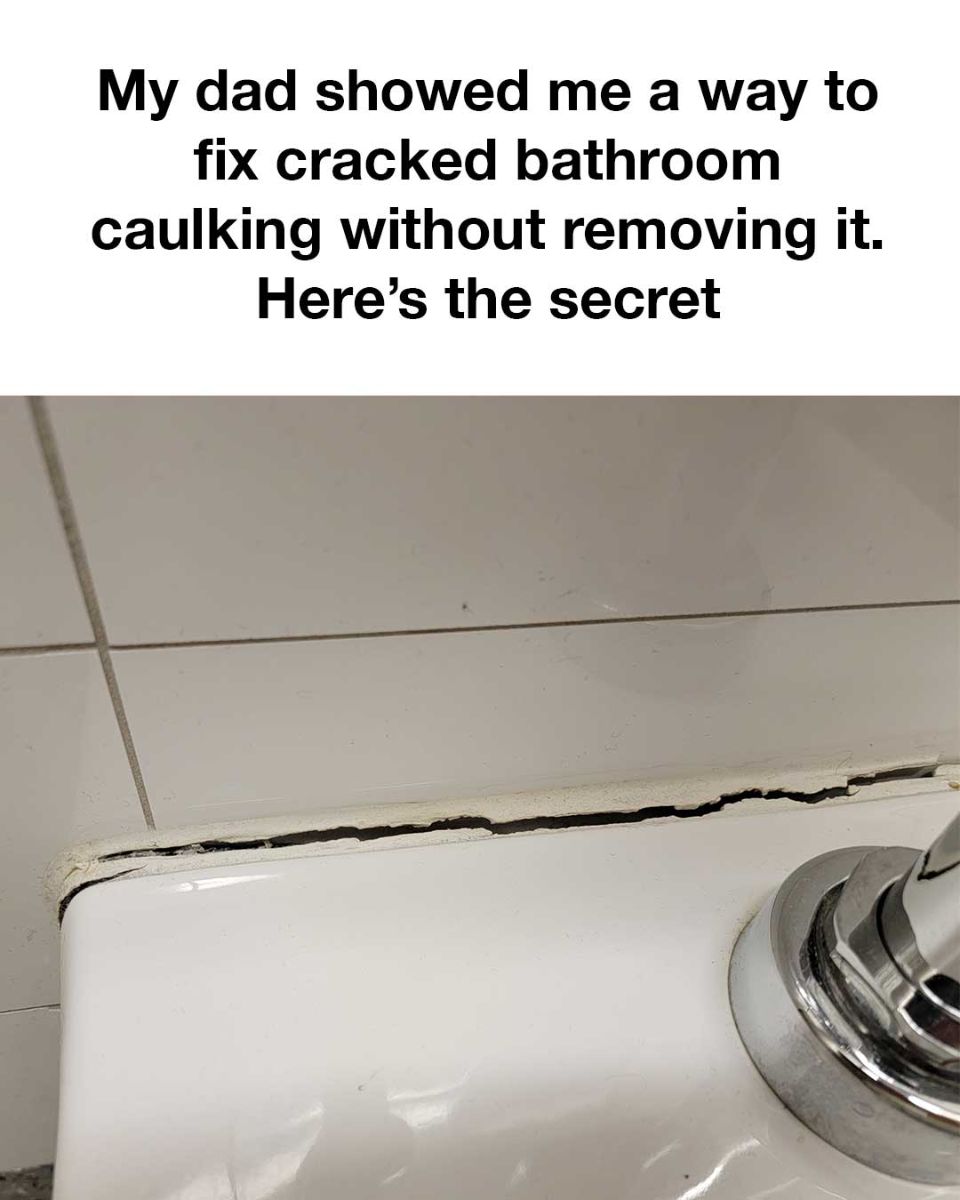
This is a problem many homeowners face, especially in bathrooms where moisture and temperature changes are constant. Thankfully, my dad—who’s been tackling home repairs for as long as I can remember—showed me a simple and incredibly effective way to deal with cracked bathroom caulking without having to go through the messy and tedious process of removing the old material entirely. His method not only gets the job done, but it also saves a lot of time, money, and effort, making it a go-to solution for anyone who wants to refresh their bathroom quickly and efficiently. Over time, caulk loses its elasticity and starts to crack or pull away from surfaces, especially in areas like showers and tubs where it’s exposed to constant water and fluctuating temperatures. These cracks aren’t just cosmetic—they create small gaps that allow water to seep behind tiles or into walls, setting the stage for mildew, mold, and costly repairs. That’s why it’s important to address the issue as soon as you notice it.
My dad’s trick involves simply applying a new layer of silicone caulk over the cracked areas instead of tearing everything out. To get started, you’ll need a few basic tools and supplies: a tube of silicone caulk (choose one that’s mildew-resistant and matches your existing caulk color), a caulk smoothing tool or a plastic spoon, painter’s tape, rubbing alcohol, a clean cloth, and a utility knife for trimming any loose edges. First, clean the area around the crack thoroughly using rubbing alcohol and a clean cloth to remove any grime, soap scum, or residue that could affect the new caulk’s ability to adhere. Once the surface is clean and dry, use painter’s tape to frame both sides of the crack so you get a nice, clean line and don’t end up smearing caulk all over the place. Then, squeeze a small bead of caulk directly onto the crack, making sure it fills the gap entirely.
Smooth it out with the back of the spoon or the caulking tool, pressing gently to ensure even coverage and a polished finish. Carefully remove the tape before the caulk begins to dry, then let it cure for at least 24 hours before using the area again. The beauty of this method lies in its simplicity. By applying a new, watertight layer of silicone caulk over the damaged area, you’re essentially reinforcing the seal without the need to scrape away every bit of old caulk. Silicone is flexible and durable, making it ideal for damp spaces like bathrooms where shifts in temperature and frequent exposure to moisture are common. This technique extends the life of your existing caulking, makes your bathroom look better instantly, and helps prevent water from leaking behind your walls or under your tub. It’s important to remember a few key things for the best results: make sure your bathroom is well-ventilated during the application and curing process, always use high-quality caulk specifically made for bathrooms, and if the damage is extensive or the existing caulk is moldy or peeling badly, you might still need to remove it entirely and start fresh.
But for small to moderate cracks, this quick fix is often more than enough. In conclusion, fixing cracked caulking in the bathroom doesn’t have to be a huge project. Thanks to this smart tip from my dad, you can take care of it yourself in just a few steps using materials you likely already have or can easily find. This method helps maintain both the appearance and functionality of your bathroom while avoiding costly repairs and time-consuming labor. It’s a great way to keep your space looking clean, fresh, and protected for the long haul without hiring a professional or launching into a full-blown renovation.